Showing posts with label install. Show all posts

Saturday, November 7, 2015

Docker: How to setup Swarm with etcd?

Alright, let me start by sharing some information about my test environment:
(i) 3 nodes (hdp1, hdp2 and hdp3) running CentOS 7.1.1503
(ii) Docker v1.9.0
(iii) etcd 2.1.1 (running only on hdp1) listening for client connection at port 4001

Node "hdp1" will be Swarm Master.

(1) Firstly, let's reconfigure the Docker daemon running on ALL the nodes by adding "-H tcp://0.0.0.0:2375".

Eg.
vi /usr/lib/systemd/system/docker.service
[Amend the line] ExecStart=/usr/bin/docker daemon -H fd:// -H tcp://0.0.0.0:2375


(2) You would have to reload systemctl and restart docker on ALL the nodes after the above changes.

systemctl daemon-reload
systemctl restart docker
[To verify] ps -ef | grep docker

(3)  Make sure "etcd" is running. If not, please start it and make sure it's listening on the intended port (4001 in this case).

systemctl start etcd
[To verify] netstat -an | grep [port] | grep LISTEN

(4) On the other nodes (non-swarm-master - in this case "hdp2" and "hdp3"), execute the following command to join them to the cluster:

docker run -d swarm join --addr=[IP of the node]:2375 etcd://[IP of etcd host]:[port]/[optional path prefix]

WHERE (in this example)
[IP of the node] = IP address of node "hdp2" and "hdp3"
[IP of etcd host] = IP address of node "hdp1" where the only etcd instance is running
[port] = Port that etcd uses to listen to incoming client connection (in this example = 4001)
[optional path prefix] = Path that etcd uses to store data about the registered Swarm nodes

The final command:
docker run -d swarm join --addr=192.168.0.171:2375 etcd://192.168.0.170:4001/swarm
docker run -d swarm join --addr=192.168.0.172:2375 etcd://192.168.0.170:4001/swarm


(5) You can verify that the nodes are registered with the following command:

etcdctl ls /swarm/docker/swarm/nodes


(6) If all nodes are registered successfully, you can now start up the Swarm Master (in this example, on node "hdp1").

docker run -p [host port]:2375 -d swarm manage -H tcp://0.0.0.0:2375 etcd://[IP of etcd host]:4001/swarm


WHERE [in this example]
[host port] = 9999 (or any other free network port you selected - you will use this port to communicate with Swarm Master)
[IP of etcd host = IP address of node "hdp1" where the only etcd instance is running

Eg.

docker run -p 9999:2375 -d swarm manage -H tcp://0.0.0.0:2375 etcd://192.168.0.170:4001/swarm

(7) To verify that the Swarm cluster is now working properly, execute the following command:

docker -H [IP of the host where Swarm Master is running]:[port] info

WHERE (in this example)
[IP of the host where Swarm Master is running] = Node "hdp1" (192.168.0.170)
[port] = 9999 (refer to Step (6) above)

NOTE: You can use any Docker CLI as normal with Swarm cluster =>

docker -H [IP of the host where Swarm Master is running]:[port] ps -a
docker -H [IP of the host where Swarm Master is running]:[port] logs [container id]
docker -H [IP of the host where Swarm Master is running]:[port] inspect [container id]

(8) Let's spin up a container and see how your Swarm cluster handles it.

docker -H [IP of the host where Swarm Master is running]:[port] run -d --name nginx-1 -p 80 nginx


(9) Let's check where the container is running.

docker -H [IP of the host where Swarm Master is running]:[port] ps -a

(10) You can stop the running container by issuing:

docker -H [IP of the host where Swarm Master is running]:[port] stop [container id]


Tuesday, November 3, 2015

Mesos/Kubernetes: How to install and run Kubernetes on Mesos with your local cluster?

First of all, let me share with you my test environment:
(1) CentOS 7.1.1503 (nodes = hdp1, hdp2 and hdp3)
(2) HDP 2.3.2 (re-using the installed Zookeeper)
(3) Docker v1.8.3
(4) golang 1.4.2
(5) etcd 2.1.1

The official documentation for Kubernetes-Mesos integration can be found here. It uses Google Compute Engine (GCE), but this blog entry will share about deploying Kubernetes-Mesos integration on a local cluster.

Ok, let's begin...

Prerequisites

(1) A working local Mesos cluster
NOTE: To build one, please refer to this.

(2) Install Docker on ALL nodes.
(a) Make sure yum has access to the official Docker repository.
(b) Execute "yum install docker-engine"
(c) Enable docker.service with "systemctl enable docker.service"
(d) Start docker.service with "systemctl start docker.service"

(3) Install "golang" on the node which you wish to install and deploy Kubernetes-Mesos integration.
(a) Execute "yum install golang"

(4) Install "etcd" on a selected node (preferably on the node that host the Kubernetes-Mesos integration for testing purposes).
(a) Execute "yum install etcd"
(b) Amend file "/usr/lib/systemd/system/etcd.service" (see below):
[FROM]
ExecStart=/bin/bash -c "GOMAXPROCS=$(nproc) /usr/bin/etcd"
[TO]
ExecStart=/bin/bash -c "GOMAXPROCS=$(nproc) /usr/bin/etcd --listen-client-urls http://0.0.0.0:4001 --advertise-client-urls http://[node_ip]:4001"
WHERE
[node_ip] = IP Address of the node (hostname -i)

(c) Reload systemctl daemon with "systemctl daemon-reload".
(d) Enable etcd.service with "systemctl enable etcd.service".
(e) Start etcd.service with "systemctl start etcd.service".

***

Build Kubernetes-Mesos

NOTE: Execute the following on the node selected to host the Kubernetes-Mesos integration.
cd [directory to install kubernetes-mesos]
git clone https://github.com/kubernetes/kubernetes
cd kubernetes
export KUBERNETES_CONTRIB=mesos
make

***

Export environment variables

(1) Export the following environment variables:

export KUBERNETES_MASTER_IP=$(hostname -i)
export KUBERNETES_MASTER=http://${KUBERNETES_MASTER_IP}:8888
export MESOS_MASTER=[zk://.../mesos]
export PATH="[directory to install kubernetes-mesos]/_output/local/go/bin:$PATH"

WHERE
[zk://.../mesos] = URL of the zookeeper nodes (Eg. zk://hdp1:2181,hdp2:2181,hdp3:2181/mesos)
[directory to install kubernetes-mesos] = Directory used to perform "git clone" (see "Build Kubernetes-Mesos" above).

(2) Amend .bash_profile to make the variables permanent.
(3) Remember to source the .bash_profile file after amendment (. ~/.bash_profile).

***

Configure and start Kubernetes-Mesos service

(1) Create a cloud config file mesos-cloud.conf in the current directory with the following contents:
$ cat <<EOF >mesos-cloud.conf
[mesos-cloud]
        mesos-master        = ${MESOS_MASTER}
EOF
NOTE:
If you have not set ${MESOS_MASTER}, it should be like (example) "zk://hdp1:2181,hdp2:2181,hdp3:2181/mesos".

(2) Create a script to start all the relevant components (API server, controller manager, and scheduler):

km apiserver \
  --address=${KUBERNETES_MASTER_IP} \
  --etcd-servers=http://${KUBERNETES_MASTER_IP}:4001 \
  --service-cluster-ip-range=10.10.10.0/24 \
  --port=8888 \
  --cloud-provider=mesos \
  --cloud-config=mesos-cloud.conf \
  --secure-port=0 \
  --v=1 >apiserver.log 2>&1 &

sleep 3

km controller-manager \
  --master=${KUBERNETES_MASTER_IP}:8888 \
  --cloud-provider=mesos \
  --cloud-config=./mesos-cloud.conf  \
  --v=1 >controller.log 2>&1 &

sleep 3

km scheduler \
  --address=${KUBERNETES_MASTER_IP} \
  --mesos-master=${MESOS_MASTER} \
  --etcd-servers=http://${KUBERNETES_MASTER_IP}:4001 \
  --mesos-user=root \
  --api-servers=${KUBERNETES_MASTER_IP}:8888 \
  --cluster-dns=10.10.10.10 \
  --cluster-domain=cluster.local \
  --contain-pod-resources=false \
  --v=2 >scheduler.log 2>&1 &

NOTE:
Since CentOS uses systemd, you will hit this issue. Hence, you need to add the "--contain-pod-resources=false" to the scheduler (in bold above).

(3) Give execute permission to the script (chmod 700 <script>).
(4) Execute the script.

***

Validate Kubernetes-Mesos services
$ kubectl get pods
NAME      READY     STATUS    RESTARTS   AGE
# NOTE: Your service IPs will likely differ
$ kubectl get services
NAME             LABELS                                    SELECTOR   IP(S)          PORT(S)
k8sm-scheduler   component=scheduler,provider=k8sm         <none>     10.10.10.113   10251/TCP
kubernetes       component=apiserver,provider=kubernetes   <none>     10.10.10.1     443/TCP
(4) Lastly, look for Kubernetes in the Mesos web GUI by pointing your browser to http://[mesos-master-ip:port]. Go to the Frameworks tab, and look for an active framework named "Kubernetes".

Kubernetest framework is registered with Mesos
***

Let's spin up a pod

(1) Write a JSON pod description to a local file:
$ cat <<EOPOD >nginx.yaml
apiVersion: v1
kind: Pod
metadata:
  name: nginx
spec:
  containers:
  - name: nginx
    image: nginx
    ports:
    - containerPort: 80
EOPOD
(2) Send the pod description to Kubernetes using the "kubectl" CLI:
$ kubectl create -f ./nginx.yaml
pods/nginx
Submitted pod through kubectl
(3) Wait a minute or two while Docker downloads the image layers from the internet. We can use the kubectl interface to monitor the status of our pod:
$ kubectl get pods
NAME      READY     STATUS    RESTARTS   AGE
nginx     1/1       Running   0          14s
(4) Verify that the pod task is running in the Mesos web GUI. Click on the Kubernetes framework. The next screen should show the running Mesos task that started the Kubernetes pod.
Mesos WebGUI shows active Kubernetes task

Mesos WebGUI shows that the Kubernetes task is RUNNING
Click through "Sandbox" link of the task to get to the "executor.log"

An example of "executor.log"

Connected to the node where the container is running

Getting Kubernetes to work on Mesos can be rather challenging at this point of time.

However, it is possible and hopefully, over time, Kubernetes-Mesos integration can work seamlessly.

Have fun!


Saturday, April 18, 2015

Docker: OpenDayLight (ODL)

I have always wanted to learn more about Software Defined Network (SDN) when I first heard about it from a colleague (now ex-colleague) about 2 years ago.

However, I have been really busy (a.k.a lazy) with work and family. Not until recently when I stumbled upon an interesting opportunity that drove me to take a peek at it.

Ok, the first big question is "OpenFlow or OpenDayLight"? Since I do not have a lot of time to perform research on their respective strengths and weaknesses, I have resorted to a very "scientific" way to choose among the two. In the end, I chose OpenDayLight because (wait for it...) I prefer their website :).

Since I am a big fan of Docker, it doesn't make sense for me to not install OpenDayLight on Docker. A quick google landed me with this. I am not interested in Debian, so I made some changes to the Dockerfile to switch the base image to Centos 6.6.


FROM centos:6.6

# Install required software (170MB)
RUN yum update -y && yum install -y tar wget java-1.7.0-openjdk

# Download and install ODL
WORKDIR /opt
RUN mkdir opendaylight

RUN wget -q "https://nexus.opendaylight.org/content/groups/public/org/opendaylight/integration/distribution-karaf/0.2.3-Helium-SR3/distribution-karaf-0.2.3-Helium-SR3.tar.gz" && \
    tar -xf distribution-karaf-0.2.3-Helium-SR3.tar.gz -C opendaylight --strip-components=1 && \
    rm -rf distribution-karaf-0.2.3-Helium-SR3.tar.gz

EXPOSE 162 179 1088 1790 1830 2400 2550 2551 2552 4189 4342 5005 5666 6633 6640 6653 7800 8000 8080 8101 8181 8383 12001

WORKDIR /opt/opendaylight
ENV JAVA_HOME /usr/lib/jvm/jre-1.7.0-openjdk.x86_64
CMD ["./bin/karaf", "server"]

NOTE:
(i) My test shows that Java 8 is currently not supported and will give weird Java NullPointerException while executing command.
(ii) You can download the Dockerfile here.

By executing "docker build -t opendaylight:helium ." in the directory where the Dockerfile is stored, I ended up with a Docker image that contains OpenDayLight.


OpenDayLight on Docker

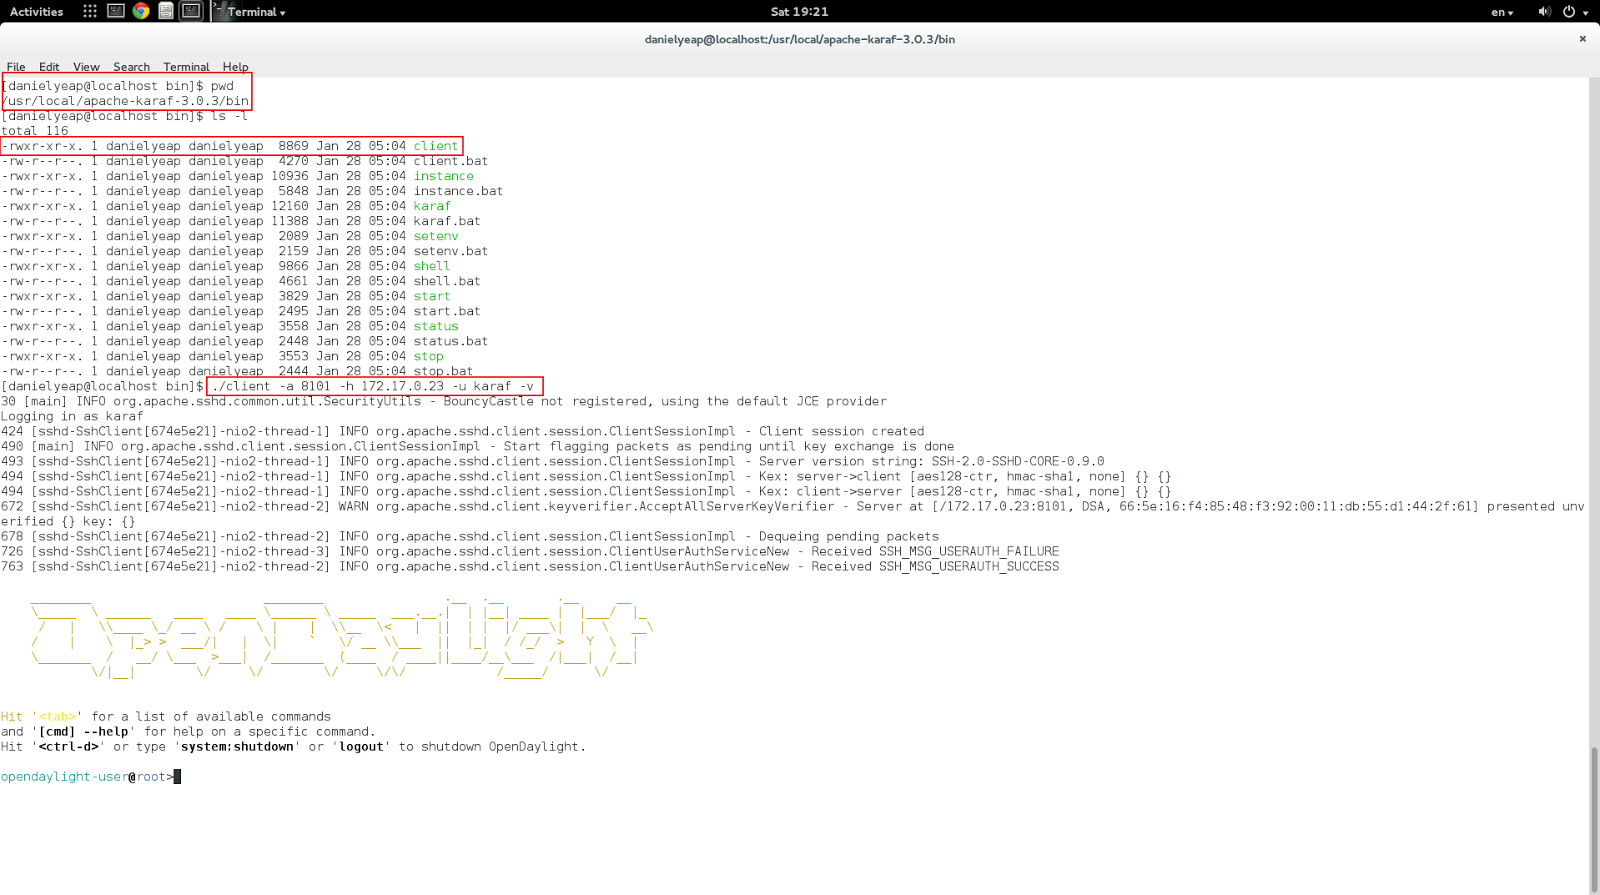
After starting the container using "docker run" command (refer to the above screenshot), it is time to SSH connect to it and install some ODL components.

This can be achieved by using the Karaf client (download).


Connect to the ODL container through Karaf client
To list all supported features, you can execute the "feature:list" command.


List all supported features
To list currently installed features, you can use the "feature:list -i" command.


Default installed features
To install some basic features, you can execute "feature:install odl-restconf odl-l2switch-switch odl-mdsal-apidocs odl-dlux-core".


Install some basic features
Now, you can proceed to login to OpenDayLight User Experience (DLUX) using URL "<IP of the Docker container>:8181/dlux/index.html.
The default user ID and password are "admin" and "admin" respectively.


DLUX login page
Voila, you are in!


DLUX login page
To learn ODL further, you can download its documentation from this page.

I am still far from really knowing how to use ODL properly. I might even explore OpenFlow one day.

Anyway, I had fun trying it out and hope that you would too!


Tuesday, March 3, 2015

Apache Mesos: Mesos + Marathon + Docker = ?

In my previous post, I talked about merging resources from multiple nodes into one using Apache Mesos.

I also talked about the 2 reasons I decided to pick up Mesos:
(1) Google Kubernetes
(2) Docker

In this post, I am going to share the method you can use to deploy Docker container on a Mesos cluster.

* Mesos and Zookeeper have to be up and running. For installation instruction, please refer to my previous post.
** I used CentOS 6.6 as the platform. So, some commands might differ on other platforms.
*** Make sure "docker-io" "(the Docker package) is installed and the daemon is running on all Mesos slave nodes.

(1) Check and update (if needed) the /etc/mesos/zk file on the node you wish to install Marathon.


vi /etc/mesos/zk

** Make sure the IP address of the Zookeeper server is written there

(2) Install Marathon (using the Mesosphere repository created in the previous post) on the node selected above (Master node is recommended for testing purpose and ease of maintenance):


yum install marathon

(3) Make sure Marathon is up and running after the installation. Otherwise, start it using:

initctl start marathon 

** Use "ps -ef" command to verify the Marathon process is running with the proper IP addresses (instead of 'localhost') of the zookeeper-server and Master node. If it is not, check the /etc/mesos/zk file again and restart.

(4) Update all the Mesos slave nodes with the following:

echo 'docker,mesos' > /etc/mesos-slave/containerizers

echo '5 mins' > /etc/mesos-slave/executor_registration_timeout

(5) Restart all the Mesos slave nodes:

initctl restart mesos-slave 

(6) By now, you should be ready to deploy Docker container on the Mesos cluster. To do so, you have to create a JSON file for the Docker container you wish to deploy:

Eg.

{
   "container": {
      "type": "DOCKER",
      "docker": {
         "image": "192.168.0.210:5000/centos63:httpd",
         "network": "HOST"
      }
   },
   "id": "centos63",
   "instances": 1,
   "cpus": 4,
   "mem": 2048,
   "uris": [],
   "cmd": "/usr/sbin/httpd -DFOREGROUND"

}


There are a few things to take note:
(a) For the "image" parameter, you would need to specify an image that is reachable by all of the Mesos slaves, because you would not know for sure which slave or slaves the Master will select to run the container.

** If you are using your own insecured private registry, please make sure you edit the docker "default" file (eg. /etc/sysconfig/docker or /etc/default/docker) to declare the registry as insecured and restart the Docker service (service docker restart):

other_args="--insecure-registry 192.168.0.210:5000" 

(b) AFAIK, Mesos (0.21.1) only support 2 network modes now - HOST or BRIDGE. 

(c) The "cmd" parameter works like CMD in Docker.


(7) Once the JSON file is ready, you can submit to Marathon using the POST method:


curl -X POST -H "Content-Type: application/json" http://<marathon host>:8080/v2/apps -d@<JSON filename> 


Marathon GUI: After the CURL command and when Mesos is deploying the container


Marathon GUI: The container is successfully deployed and RUNNING


Mesos GUI: Shows one active task running on "mesos4" slave node


Mesos GUI: Clicking on the task shows the details (it's a SANDBOX)


Mesos GUI: STDOUT and STDERR are streamed from the container to the sandbox


On 'mesos4' node, the image is downloaded from the private repo and a container is running


On 'mesos4' node, 'docker inspect <container id>' shows the networking mode is HOST as configured


On 'mesos3' node, a HTTP connection shows HTTPD container is indeed running on 'mesos4' node

Friday, February 27, 2015

Apache Mesos: When All Becomes One

First of all, for the benefits of those unfamiliar with Apache Mesos, this is the "what is" taken from its official website:

What is Mesos?

A distributed systems kernel

Mesos is built using the same principles as the Linux kernel, only at a different level of abstraction. The Mesos kernel runs on every machine and provides applications (e.g., Hadoop, Spark, Kafka, Elastic Search) with API’s for resource management and scheduling across entire datacenter and cloud environments.

Beside the fact that I have always wanted to learn a technology that can merge all the resources available on my multiple machines into one, I am out to learn Apache Mesos for the following 2 reasons (currently):
(1) Google Kubernetes
(2) Docker

Installing Apache Mesos isn't too hard if you follow the instruction available on its official website, but I would like to share an alternative installation method which I found is more straightforward:

* Instructions only suitable for RHEL/CentOS 6 (tested on CentOS 6.6). For other platforms, refer here.
** Run all instructions as 'root' user for simplicity.


(1) On the node or VM image that you would like to designate as the Master and all slave nodes, execute the following command to create the Mesosphere repository:

rpm -Uvh http://repos.mesosphere.io/el/6/noarch/RPMS/mesosphere-el-repo-6-2.noarch.rpm

(2) On the Master and all the slave nodes, install Mesos:

yum -y install mesos

(3) Even though you only plan to have a single Master node, it is advisable to install Zookeeper (just in case you want to expand in the future):

rpm -Uvh http://archive.cloudera.com/cdh4/one-click-install/redhat/6/x86_64/cloudera-cdh-4-0.x86_64.rpm 

yum -y install zookeeper-server

* You can install the Zookeeper server on either the Master node (preferred for ease of maintenance) or any of the slave node.
** You need to have Java installed for Zookeeper to work properly.

(4) On the Master node, initialize Zookeeper:

service zookeeper-server init 

echo 1 | sudo tee -a /var/lib/zookeeper/myid >/dev/null

(5) On the Master node, stop and disable mesos-slave:

initctl stop mesos-slave

cd /etc/init/ 

mv mesos-slave.conf mesos-slave.disable

(6) On all the slave nodes, stop and disable mesos-master:

initctl stop mesos-master

cd /etc/init/ 

mv mesos-master.conf mesos-master.disable

(7) On the Master node, set the IP address:

echo <IP of the Master node> | sudo tee /etc/mesos-master/ip

(8) On the Master node, set the name of the cluster:

echo <cluster name> | sudo tee /etc/mesos-master/cluster 

(9) On the Master and all slave nodes, set the URL of the Zookeeper server:

echo zk://<IP of the Zookeeper server>:2181/mesos | sudo tee /etc/mesos/zk

(10) On all the slave nodes, set their respective IP address:

echo <IP of the Slave node>  | sudo tee /etc/mesos-slave/ip  

(11) On the Master node, restart mesos-master and Zookeeper (if it is installed there):

service zookeeper restart 

initctl restart mesos-master

(12) On all the slave nodes, restart mesos-slave:

initctl restart mesos-slave

(12) Verify that the Master is running and all slaves are registered with it:

http://<IP of the Master node>:5050


When the Master is first initialized
When the first slave joined
When the second slave joined
When the third slave joined
All the slaves