Saturday, August 22, 2015

D3.js: How to draw a Node Relationship Graph like Neo4J?

First of all, I am deeply sorry for the lack of update for this blog! I have been really busy with my work, family and self-learning.

Anyway, this entry is about some cool technologies that I have been spending time lately - Neo4j and D3.js.

I have always been curious about graph database. Recently, I have finally conceded to my better curious half and started to get my hands on Neo4j (one of the more popular graph database engine).

I am greatly impressed by its Web GUI that is able to draw a proper Node -> Relationship graph that is both pretty and practical.

Courtesy from Neo4j website

At work, I have a sudden need for such a graph to analyze some really complex text-based source-target relationships. That was how D3.js came into play!

I have always known that I need to lay my hands on D3.js one day for data visualisation. This need at work just justified it.

After some googling and reading, I ended up with the codes below:
NOTE: Simplified to increase readability!

<!DOCTYPE html>
<html lang="en">
<head>
<%@page pageEncoding="UTF-8" contentType="text/html; charset=UTF-8"%>
<title>Node Relationship Graph</title>
<script type="text/javascript" src="d3/d3.min.js"></script>
<style>

path.link {
  fill: none;
  stroke: #666;
  stroke-width: 1.5px;
}

circle {
  fill: #ccc;
  stroke: #fff;
  stroke-width: 1.5px;
}

text {
  fill: #000;
  font: 10px sans-serif;
  pointer-events: none;
}

</style>
</head>

    <BODY>
<script type="text/javascript">
d3.csv("data/lsrel.csv", function(error, links) {

var nodes = {};
var rel = {};

// Compute the distinct nodes from the links.
links.forEach(function(link) {
    link.id = "rel" + link.relnum; 
    // link.relnum = link.relnum;
   var sLinkSrc = link.source;
   var sLinkTgt = link.target;
    link.source = nodes[link.source] || 
        (nodes[link.source] = {name: link.source, relcnt: 0, srccnt: 0, tgtcnt: 0});
    link.target = nodes[link.target] || 
        (nodes[link.target] = {name: link.target, relcnt: 0, srccnt: 0, tgtcnt: 0});
    link.relationship = link.relationship;
   
   if (nodes[sLinkSrc])
   {
         nodes[sLinkSrc]["relcnt"] = nodes[sLinkSrc]["relcnt"]+1;
         nodes[sLinkSrc]["srccnt"] = nodes[sLinkSrc]["srccnt"]+1;
   }

   if (nodes[sLinkTgt])
   {
         nodes[sLinkTgt]["relcnt"] = nodes[sLinkTgt]["relcnt"]+1;
         nodes[sLinkTgt]["tgtcnt"] = nodes[sLinkTgt]["tgtcnt"]+1;
   }

   // console.log(JSON.stringify(nodes));
   // console.log("NODEPROP: " + nodes[sLinkSrc].name);

});

var width = screen.width-80,
    height = screen.height-80;

console.log("Width: " + width);
console.log("Height: " + height);

var force = d3.layout.force()
    .nodes(d3.values(nodes))
    .links(links)
    .size([width, height])
    .linkDistance(350)
    .charge(-800)
    .on("tick", tick)
    .start();

var drag = force.drag()
            .on("dragstart", dragstart);

var svg = d3.select("body").append("svg")
    .attr("width", width)
    .attr("height", height);

// build the arrow.
svg.append("svg:defs").selectAll("marker")
    .data(["end"])
  .enter().append("svg:marker")
    .attr("id", String)
    .attr("viewBox", "0 -5 10 10")
    .attr("refX", 22)
    .attr("refY", -1)
    .attr("markerWidth", 8)
    .attr("markerHeight", 8)
    .attr("orient", "auto")
  .append("svg:path")
    .attr("d", "M0,-5L10,0L0,5");

// add the links and the arrows
var path = svg.append("svg:g").selectAll("path")
    .data(force.links())
  .enter()
.append("svg:path")
   .attr("id", function(d) { return d.id; } )
    .attr("class", "link")
    .attr("marker-end", "url(#end)");

var mytext = svg.append("svg:g").selectAll("text")
.data(force.links())
.enter()
.append("text")
.attr("dx", "150")
.attr("dy", "-8")
 .append("textPath")
 .attr("xlink:href", function(d) { return "#" + d.id; })
 .attr("style", "fill:magenta; font-weight:bold; font-size:12")
 .text(function(d) { return d.relationship; } );

// define the nodes
var node = svg.selectAll(".node")
    .data(force.nodes())
  .enter().append("g")
    .attr("class", "node")
    .call(force.drag);

// add the nodes
node.append("circle")
    .attr("r", 12)
    .attr("fill", "grey")
   .append("svg:title")
   .text(function(d) { return "Source: " + d.srccnt + " ~ Target: " + d.tgtcnt; });

// add the text
node.append("text")
    .attr("x", 12)
    .attr("dy", ".35em")
    .attr("style", "fill:blue; font-weight:bold; font-size:16")
    .text(function(d) { return d.name; });

node.append("text")
   .attr("text-anchor", "middle")
    // .attr("style", "font-weight:bold; font-size:12")
    .attr("style", function(d) {
      if (d.relcnt >= 3)
      {
         return "font-weight:bold; font-size:12; fill:red"
      }
      else
      {
         return "font-weight:bold; font-size:12"
      }
   })
   .text(function(d) { return d.relcnt; });

// add the curvy lines
function tick() {
    path.attr("d", function(d) {
        var dx = d.target.x - d.source.x,
            dy = d.target.y - d.source.y,
            dr = Math.sqrt(dx * dx + dy * dy);
        return "M" +
            d.source.x + "," +
            d.source.y + "A" +
            dr + "," + dr + " 0 0,1 " +
            d.target.x + "," +
            d.target.y;
    });

    node
         .attr("transform", function(d) {
             return "translate(" + d.x + "," + d.y + ")"; });
}

function dragstart(d)
{
   d3.select(this).classed("fixed", d.fixed = true);
}
if (error)
{
   console.log(error);
}
else
{
   console.log(nodes);
   console.log(links);
   console.log(path);
   console.log(rel);
}
});

</script>

    </BODY>
</HTML>      


A sample of the input file "lsrel.csv" is as follow:

relnum,source,target,relationship
6,c,a,DependsOn
5,c,d,Anti-Collocated
1,a,b,DependsOn
2,a,c,StartAfter
3,b,c,StopAfter
4,b,d,Collocated

The output of the D3.js script based on the data above:

Hope you guys like it!

Saturday, April 18, 2015

Docker: OpenDayLight (ODL)

I have always wanted to learn more about Software Defined Network (SDN) when I first heard about it from a colleague (now ex-colleague) about 2 years ago.

However, I have been really busy (a.k.a lazy) with work and family. Not until recently when I stumbled upon an interesting opportunity that drove me to take a peek at it.

Ok, the first big question is "OpenFlow or OpenDayLight"? Since I do not have a lot of time to perform research on their respective strengths and weaknesses, I have resorted to a very "scientific" way to choose among the two. In the end, I chose OpenDayLight because (wait for it...) I prefer their website :).

Since I am a big fan of Docker, it doesn't make sense for me to not install OpenDayLight on Docker. A quick google landed me with this. I am not interested in Debian, so I made some changes to the Dockerfile to switch the base image to Centos 6.6.


FROM centos:6.6

# Install required software (170MB)
RUN yum update -y && yum install -y tar wget java-1.7.0-openjdk

# Download and install ODL
WORKDIR /opt
RUN mkdir opendaylight

RUN wget -q "https://nexus.opendaylight.org/content/groups/public/org/opendaylight/integration/distribution-karaf/0.2.3-Helium-SR3/distribution-karaf-0.2.3-Helium-SR3.tar.gz" && \
    tar -xf distribution-karaf-0.2.3-Helium-SR3.tar.gz -C opendaylight --strip-components=1 && \
    rm -rf distribution-karaf-0.2.3-Helium-SR3.tar.gz

EXPOSE 162 179 1088 1790 1830 2400 2550 2551 2552 4189 4342 5005 5666 6633 6640 6653 7800 8000 8080 8101 8181 8383 12001

WORKDIR /opt/opendaylight
ENV JAVA_HOME /usr/lib/jvm/jre-1.7.0-openjdk.x86_64
CMD ["./bin/karaf", "server"]

NOTE:
(i) My test shows that Java 8 is currently not supported and will give weird Java NullPointerException while executing command.
(ii) You can download the Dockerfile here.

By executing "docker build -t opendaylight:helium ." in the directory where the Dockerfile is stored, I ended up with a Docker image that contains OpenDayLight.


OpenDayLight on Docker

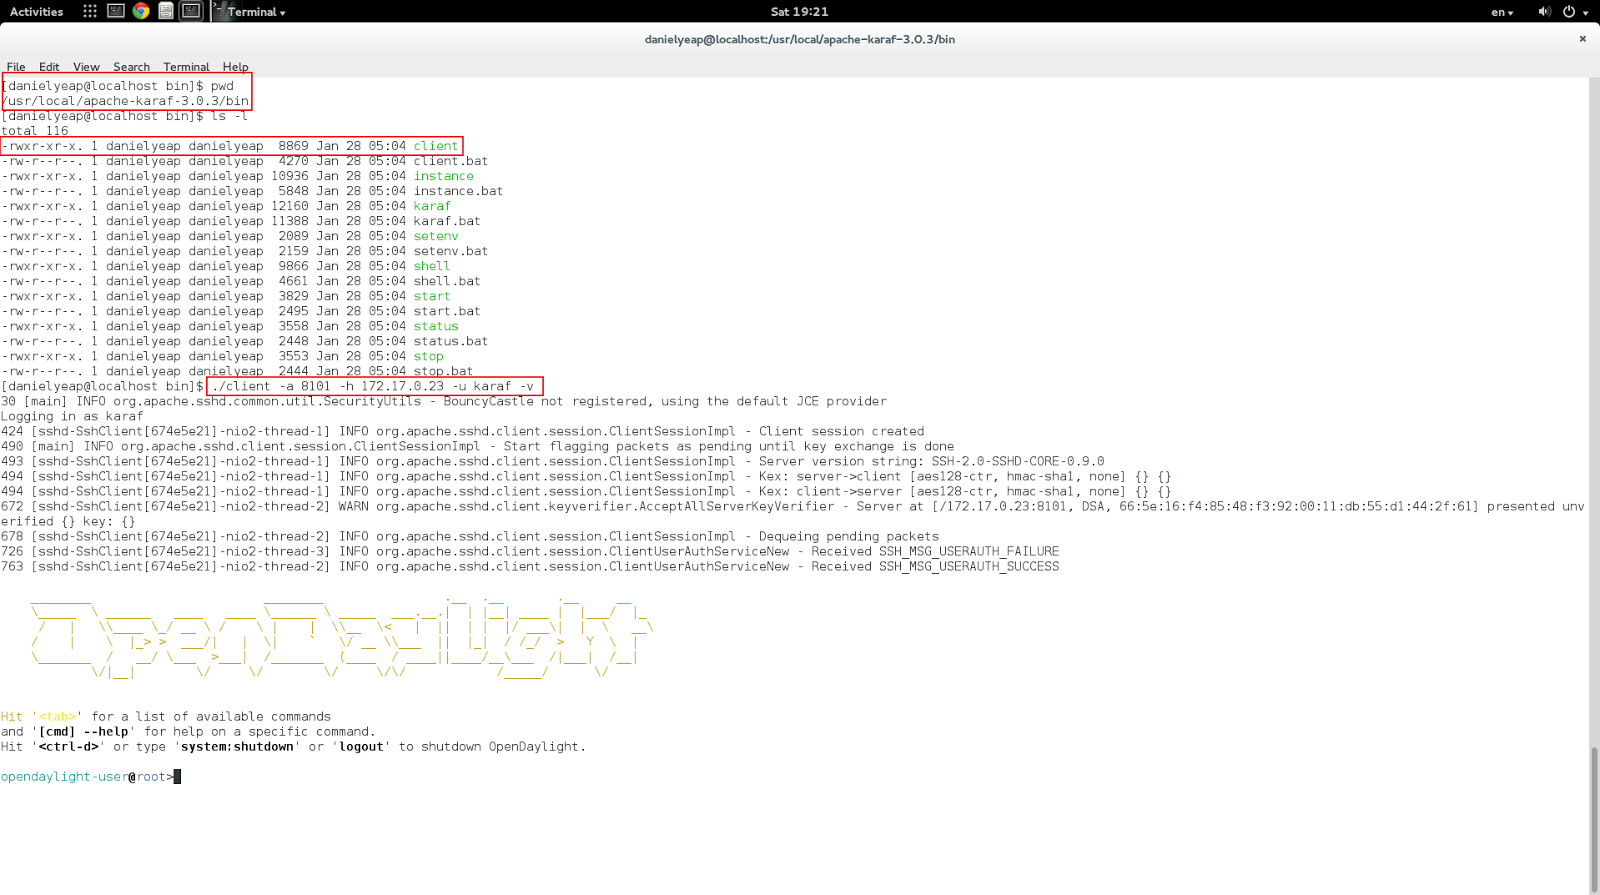
After starting the container using "docker run" command (refer to the above screenshot), it is time to SSH connect to it and install some ODL components.

This can be achieved by using the Karaf client (download).


Connect to the ODL container through Karaf client
To list all supported features, you can execute the "feature:list" command.


List all supported features
To list currently installed features, you can use the "feature:list -i" command.


Default installed features
To install some basic features, you can execute "feature:install odl-restconf odl-l2switch-switch odl-mdsal-apidocs odl-dlux-core".


Install some basic features
Now, you can proceed to login to OpenDayLight User Experience (DLUX) using URL "<IP of the Docker container>:8181/dlux/index.html.
The default user ID and password are "admin" and "admin" respectively.


DLUX login page
Voila, you are in!


DLUX login page
To learn ODL further, you can download its documentation from this page.

I am still far from really knowing how to use ODL properly. I might even explore OpenFlow one day.

Anyway, I had fun trying it out and hope that you would too!


Sunday, April 12, 2015

Java: Stream Control Transmission Protocol (SCTP)

If you have not heard about SCTP, don't fret! Me neither, until recently.

For a good explanation about SCTP, you can read this and this and this. In short, SCTP is basically TCP on steroids!

People who knows me well knew that I am always curious about new technology or technology new to me (sorry if I confuse you :).

How can I miss the chance to explore SCTP futher? Of course, the language of choice would be Java - still my favorite language after all these years.

First, I created the SctpServer class to serve as a SCTP server.
Next, I created the SctpClient class to serve as the SCTP client that will connect to multiple SCTP servers started on different ports (same host in this case) through a single socket (YES, you read it right, single socket!).


Two SctpServers listening on port 12000 and 12001. An SCTP client sends message to them on the same socket.
From the image above, you can see that there are 2 SctpServer listening on port 12000 and 12001 respectively.

Once the ScptClient connects to them and send them messages, you can see both servers reported that the connection came from port 43975 with stream number of 0 (SctpServer that listens on port 12000) and 1 (SctpServer that listens on port 12001) respectively.


SctpClient uses SctpMultiChannel for its communication.

Now, if you take a look at the codes for SctpClient, there is no "connect" statement at all. That is because a new association will automatically be created for every "send" command. [reference]

The destination of your message/data is now encapsulated in the MessageInfo object.

If you have the interest to explore SCTP further, you can download the sample codes here.

Enjoy hacking!


Wednesday, April 8, 2015

Docker User Group Malaysia

I created the Docker User Group Malaysia on Facebook a few months ago.

The intention is to share information and knowledge with all Docker users within Malaysia.

From 2 members (myself and a colleague of mine), it has now grown to 8 members (some nice folks from Mindvalley).

If you are interested to join or learn more about Docker, you can visit this Facebook group anytime!

Monday, April 6, 2015

Apache Storm: HBase Bolt

Starting with version 0.9.2-incubating, Storm included support for HBase as bolt. You no longer need to seek third party packages to do that, which is a great news!

To refer to the APIs and documentation, you can go here.

I have coded a simple Storm application that takes Kafka as spout and HBase as bolt. In other words, the application will get its data from Kafka and then write to HBase.

One interesting item within Apache Storm is stream grouping (how tuples produced by spouts will be handled by available bolts). To read more about stream grouping, you can refer here.

Lastly, if you want to try it out yourself, you can download the sample codes here.


Storm UI that shows Kafka spout and HBase bolt processing

Tuesday, March 10, 2015

Apache Storm: How to add external JARs or packages into CLASSPATH while running 'storm jar'?

I have been playing with 'storm-kafka' and 'storm-hbase' lately. Basically, they are projects/tools that one can use to integrate Kafka and HBase with storm.

My project was to have Kafka as spout and HBase as bolt. In other words, my application will pull data from Kafka and then write the output to HBase. In other other words (pun intended :), I need to have the storm-kafka and storm-hbase JAR included when I run my Storm topology.

There are a few ways to do this:
(1) Put the JARs under STORM_BASE_DIR
(2) Put the JARs under STORM_BASE_DIR/lib
(3) Put the package under STORM_CONF_DIR
(4) Include the package into the topology JAR

After trying the above few methods, my favourite is method #4. However, it is not without its own pain points.

Let me explain why I do not like the other methods.

Method #1
=======
By putting JARs into STORM_BASE_DIR, I have a feeling that I have 'corrupted' the directory. Messing up a standard directory of a product is not my cup of tea.

Method #2
=======
See Method #1 above.

Method #3
=======
Since the storm.py codes do not search the directory declared as STORM_CONF_DIR (or USER_CONF_DIR) for JARs, you would have to put the package files in that directory. How many times have I said 'messy'? :)

Now, let's discuss Method #4. I say it is my favourite, but I never say it is the best. That is because it will grow your JAR file size greatly if you have some really big external JARs to include (beside your topology). However, I feel that it is the most acceptable approach because it is more manageable than the other methods (at least to me :).

Hence, if you are looking into including or adding external JARs while running your Storm topology, I would suggest you to include those JARs into your topology JAR for the time being until there is a neater way to do this!

NOTE:
Environment = HDP 2.2 (Storm 0.9.3)


Source codes of storm.py and how CLASSPATH is determined

Tuesday, March 3, 2015

Apache Mesos: Mesos + Marathon + Docker = ?

In my previous post, I talked about merging resources from multiple nodes into one using Apache Mesos.

I also talked about the 2 reasons I decided to pick up Mesos:
(1) Google Kubernetes
(2) Docker

In this post, I am going to share the method you can use to deploy Docker container on a Mesos cluster.

* Mesos and Zookeeper have to be up and running. For installation instruction, please refer to my previous post.
** I used CentOS 6.6 as the platform. So, some commands might differ on other platforms.
*** Make sure "docker-io" "(the Docker package) is installed and the daemon is running on all Mesos slave nodes.

(1) Check and update (if needed) the /etc/mesos/zk file on the node you wish to install Marathon.


vi /etc/mesos/zk

** Make sure the IP address of the Zookeeper server is written there

(2) Install Marathon (using the Mesosphere repository created in the previous post) on the node selected above (Master node is recommended for testing purpose and ease of maintenance):


yum install marathon

(3) Make sure Marathon is up and running after the installation. Otherwise, start it using:

initctl start marathon 

** Use "ps -ef" command to verify the Marathon process is running with the proper IP addresses (instead of 'localhost') of the zookeeper-server and Master node. If it is not, check the /etc/mesos/zk file again and restart.

(4) Update all the Mesos slave nodes with the following:

echo 'docker,mesos' > /etc/mesos-slave/containerizers

echo '5 mins' > /etc/mesos-slave/executor_registration_timeout

(5) Restart all the Mesos slave nodes:

initctl restart mesos-slave 

(6) By now, you should be ready to deploy Docker container on the Mesos cluster. To do so, you have to create a JSON file for the Docker container you wish to deploy:

Eg.

{
   "container": {
      "type": "DOCKER",
      "docker": {
         "image": "192.168.0.210:5000/centos63:httpd",
         "network": "HOST"
      }
   },
   "id": "centos63",
   "instances": 1,
   "cpus": 4,
   "mem": 2048,
   "uris": [],
   "cmd": "/usr/sbin/httpd -DFOREGROUND"

}


There are a few things to take note:
(a) For the "image" parameter, you would need to specify an image that is reachable by all of the Mesos slaves, because you would not know for sure which slave or slaves the Master will select to run the container.

** If you are using your own insecured private registry, please make sure you edit the docker "default" file (eg. /etc/sysconfig/docker or /etc/default/docker) to declare the registry as insecured and restart the Docker service (service docker restart):

other_args="--insecure-registry 192.168.0.210:5000" 

(b) AFAIK, Mesos (0.21.1) only support 2 network modes now - HOST or BRIDGE. 

(c) The "cmd" parameter works like CMD in Docker.


(7) Once the JSON file is ready, you can submit to Marathon using the POST method:


curl -X POST -H "Content-Type: application/json" http://<marathon host>:8080/v2/apps -d@<JSON filename> 


Marathon GUI: After the CURL command and when Mesos is deploying the container


Marathon GUI: The container is successfully deployed and RUNNING


Mesos GUI: Shows one active task running on "mesos4" slave node


Mesos GUI: Clicking on the task shows the details (it's a SANDBOX)


Mesos GUI: STDOUT and STDERR are streamed from the container to the sandbox


On 'mesos4' node, the image is downloaded from the private repo and a container is running


On 'mesos4' node, 'docker inspect <container id>' shows the networking mode is HOST as configured


On 'mesos3' node, a HTTP connection shows HTTPD container is indeed running on 'mesos4' node