While I have always wanted such feature (automatically updated /etc/hosts for all running containers), I understand that Docker does not provide it natively (just yet - or at least AFAIK). I also understand some security issues that might come with such feature (not all running containers want other containers to connect to it).
Anyway, about 2 weeks ago, while I was dockerizing a system automation application that requires at least 2 running nodes (containers), I found that the feature was silently available*.
* I went through the Release Notes of almost all recent releases and could not find such feature being mentioned. If I got it wrong, please point me to the proper Release Notes. Thanks!
Before I forget, let me share with you the reason I have always wanted such feature. My reason is simple - I need all my running containers to know the "existence" of other related containers and have a way to communicate with them (in this case, through /etc/hosts).
My test environment was on CentOS 7.1 and Docker 1.8.2.
(1) Firstly, I started a container without any hostname and container name. You can see that the /etc/hosts file was updated with:
(a) the container ID as the hostname
(b) the container name as the hostname
(2) Next, I started another container with an assigned hostname of "node1". You can see that now the /etc/hosts was updated with:
(a) the assigned hostname
(b) the container name as the hostname
(3) To spice it up a little bit more, I started another container with an assigned hostname and gave the container a name. You can see that the /etc/hosts was updated with:
(a) the assigned hostname
(b) the given container name
(4) The next test was to start up 3 containers with different hostname and given name and left all of them running. You can see that "node1" was started and its /etc/hosts was updated accordingly.
(5) Next, I started "node2" and its /etc/hosts was updated with details of "node1" too.
(6) What happened to the /etc/hosts of "node1" at this moment? Surprise, surpirse...you can see that its /etc/hosts was updated with details of "node2" too.
(7) Just to make sure it's not devaju. I started the third container ("node1" and "node2" were still running). This time I wasn't surprised to see that the /etc/hosts of "node3" was updated with details of "node1" and "node2".
(8) Lastly, let's check the /etc/hosts of "node1" and "node2". Viola, they are updated too!
Seriously, I am not sure whether this feature has been available for some time or it is an experimental feature. Anyway, I like it...for the thing I do! So, I am not speaking for you :)
I am a technology enthusiast and application support engineer by profession. All posts shared in this blog is based on my best knowledge. The objective of this blog is to share information and experience in hope that it will help save some of you some time while exploring these fun and exciting technologies.
Saturday, October 10, 2015
Sunday, October 4, 2015
Docker: Sharing Kernel Module
This is more like a request-for-help entry :)
I was working on a small project to dockerize a system automation application that supports clustering. Everything was working fine until the very last minute - during system startup!!!
The database was working fine in a primary-standby setup. The system automation application was running fine on both of the nodes in the cluster. Configuration went fine too.
However, when I started the automation monitoring, KABOOOOMMM, problem happened!
What happened was that the first node came up fine, but the second node seems to be reporting weird status. A quick read of the log file told me that the second node was unable to load the "softdog" kernel module and would not be able to initialize. The reason is very likely because the first node has already gotten hold of the kernel module.
Ok, I have to admit that this is a silly mistake I made and an oversight before I started the project.
Anyway, I would like to share what I learned from this experience:
(1) It is possible to have access to kernel module by:
(a) mounting the /lib/modules directory read-only into the container (-v /lib/modules:/lib/modules:ro).
(b) the kernel version of the host machine must be the same with the kernel version of the image/container.
(c) run the container with --privileged option.
For those people out there that are trying to dockerize applications that require kernel module, please be reminded that all containers on a same host would share the same underlying (host) kernel. Hence, you have to make sure that the application would still work under such condition.
I am not a kernel expert and have not ventured into this area in Docker previously, so any help is appreciated - SOS!!!!!
I was working on a small project to dockerize a system automation application that supports clustering. Everything was working fine until the very last minute - during system startup!!!
The database was working fine in a primary-standby setup. The system automation application was running fine on both of the nodes in the cluster. Configuration went fine too.
However, when I started the automation monitoring, KABOOOOMMM, problem happened!
What happened was that the first node came up fine, but the second node seems to be reporting weird status. A quick read of the log file told me that the second node was unable to load the "softdog" kernel module and would not be able to initialize. The reason is very likely because the first node has already gotten hold of the kernel module.
Ok, I have to admit that this is a silly mistake I made and an oversight before I started the project.
Anyway, I would like to share what I learned from this experience:
(1) It is possible to have access to kernel module by:
(a) mounting the /lib/modules directory read-only into the container (-v /lib/modules:/lib/modules:ro).
(b) the kernel version of the host machine must be the same with the kernel version of the image/container.
(c) run the container with --privileged option.
For those people out there that are trying to dockerize applications that require kernel module, please be reminded that all containers on a same host would share the same underlying (host) kernel. Hence, you have to make sure that the application would still work under such condition.
I am not a kernel expert and have not ventured into this area in Docker previously, so any help is appreciated - SOS!!!!!
Saturday, September 12, 2015
Running Apache Spark on Mesos
Running Apache Spark on Mesos is easier than I thought!
I have 3 nodes at home (hdp1, hdp2 and hdp3) which are running Hortonworks Data Platform (HDP). I have HDFS, Zookeeper and Spark installed on the cluster.
To test running Spark on Mesos, I decided to reuse the cluster for simplicity's sake.
All I did was:
(1) install Mesos master on node hdp1.
(2) install Mesos slave on node hdp2 and hdp3.
(3) configure the master and slaves accordingly.
NOTE:
(i) For more information about the installation and configuration of Mesos, you can refer to this blog entry.
(ii) I reuse Zookeeper that was installed with HDP.
Once Mesos is up and running, I decided to carry out a very simple test that is described as follow:
(1) Use "spark-shell" as the Spark client to connect to the Mesos cluster.
(2) Load a sample text file into HDFS.
(3) Use spark-shell to perform a line count on the loaded text file.
First, let's see what is the command that you can use to connect spark-shell to a running Mesos cluster.
TIPS: All you need to do is to use the "--master" option to point to the Mesos cluster at "mesos://<IP-or-hostname of Mesos master>:5050".
Then, let's load a sample text file into HDSF using the "hadoop fs -put" command.
Once the sample text file is loaded, let's create a spark RDD using it.
TIPS: You can use the "sc.textFile" function and points it to "hdfs://<namenode>:8020/<path to file>".
After the RDD is created, let's run a count on it using the "count()" function.
You can see from the screenshot above and below that, Spark (through Mesos) has submitted 2 tasks that are executed on node hdp2 and hdp3 respectively.
You can also see from the screenshot above that the end result is returned as "4" (which means 4 lines in the file - which is correct!).
So, that is how easy it is to run Spark on Mesos.
Hope that you are going to try it out!
I have 3 nodes at home (hdp1, hdp2 and hdp3) which are running Hortonworks Data Platform (HDP). I have HDFS, Zookeeper and Spark installed on the cluster.
To test running Spark on Mesos, I decided to reuse the cluster for simplicity's sake.
All I did was:
(1) install Mesos master on node hdp1.
(2) install Mesos slave on node hdp2 and hdp3.
(3) configure the master and slaves accordingly.
NOTE:
(i) For more information about the installation and configuration of Mesos, you can refer to this blog entry.
(ii) I reuse Zookeeper that was installed with HDP.
Once Mesos is up and running, I decided to carry out a very simple test that is described as follow:
(1) Use "spark-shell" as the Spark client to connect to the Mesos cluster.
(2) Load a sample text file into HDFS.
(3) Use spark-shell to perform a line count on the loaded text file.
First, let's see what is the command that you can use to connect spark-shell to a running Mesos cluster.
TIPS: All you need to do is to use the "--master" option to point to the Mesos cluster at "mesos://<IP-or-hostname of Mesos master>:5050".
Then, let's load a sample text file into HDSF using the "hadoop fs -put" command.
Once the sample text file is loaded, let's create a spark RDD using it.
TIPS: You can use the "sc.textFile" function and points it to "hdfs://<namenode>:8020/<path to file>".
After the RDD is created, let's run a count on it using the "count()" function.
You can see from the screenshot above and below that, Spark (through Mesos) has submitted 2 tasks that are executed on node hdp2 and hdp3 respectively.
You can also see from the screenshot above that the end result is returned as "4" (which means 4 lines in the file - which is correct!).
So, that is how easy it is to run Spark on Mesos.
Hope that you are going to try it out!
Saturday, September 5, 2015
Neo4j: How to import data using neo4j-import?
One of the few first things to do while learning a new database is to load some sample data and there is no difference when it comes to Neo4j.
With Neo4j, my preferred way of data loading is through the neo4j-import command.
While the documentation available is decent, new users might face some challenges accomplishing it (at least I was struggling at one point of time :).
That is the purpose of me writing this blog entry - to help those that need a quick-start guide for loading data into Neo4j.
Let's do it in a cookbook manner...
(1) Read the following documentations:
http://neo4j.com/docs/stable/import-tool.html
It's ok if you do not understand fully. Please allow me to share with you an example.
(2) Let's create the CSV needed to represent NODE and RELATIONSHIP.
The example that I have here is a simple banking system that contains the following NODEs:
(a) CUSTOMER
(b) ACCOUNT
(c) ATM
and the following RELATIONSHIPs:
(a) CUSTOMER->ACCOUNT [OWNS]
(b) ACCOUNT->ACCOUNT [TXFER]
(c) CUSTOMER->ATM [WITHDRAW]
(3) First, let's create the CSV files for the NODEs.
According to the documentation (see excerpt below), the CSV header for a NODE must contain an ID and a LABEL.
[http://neo4j.com/docs/stable/import-tool-header-format.html]
With Neo4j, my preferred way of data loading is through the neo4j-import command.
While the documentation available is decent, new users might face some challenges accomplishing it (at least I was struggling at one point of time :).
That is the purpose of me writing this blog entry - to help those that need a quick-start guide for loading data into Neo4j.
Let's do it in a cookbook manner...
(1) Read the following documentations:
http://neo4j.com/docs/stable/import-tool.html
It's ok if you do not understand fully. Please allow me to share with you an example.
(2) Let's create the CSV needed to represent NODE and RELATIONSHIP.
The example that I have here is a simple banking system that contains the following NODEs:
(a) CUSTOMER
(b) ACCOUNT
(c) ATM
and the following RELATIONSHIPs:
(a) CUSTOMER->ACCOUNT [OWNS]
(b) ACCOUNT->ACCOUNT [TXFER]
(c) CUSTOMER->ATM [WITHDRAW]
(3) First, let's create the CSV files for the NODEs.
According to the documentation (see excerpt below), the CSV header for a NODE must contain an ID and a LABEL.
[http://neo4j.com/docs/stable/import-tool-header-format.html]
Nodes
The following field types do additionally apply to node data sources:
- ID
- Each node must have a unique id which is used during the import. The ids are used to find the correct nodes when creating relationships. Note that the id has to be unique across all nodes in the import, even nodes with different labels.
- LABEL
- Read one or more labels from this field. For multiple labels, the values are separated by the array delimiter.
- How do we do that? Simple...
- [danielyeap@myhost neo4j-data]$ cat customer.csv
- custID:ID(CUSTOMER),firstname,lastname,since:int,:LABEL
- 1,Daniel,Yeap,1999,CUSTOMER
- 2,John,Smith,1999,CUSTOMER
- 3,Tod,Pitt,2010,CUSTOMER
- 4,Isabel,Grager,2014,CUSTOMER
- [danielyeap@myhost neo4j-data]$ cat atm.csv
- atmId:ID(ATM),location,:LABEL
- 1,Damansara Uptown,ATM
- 2,Kota Damansara,ATM
- 3,Jalan Ipoh,ATM
- [danielyeap@myhost neo4j-data]$ cat account.csv
- custId:int,acctno:ID(ACCOUNT),:LABEL
- 1,11111,ACCOUNT
- 1,11112,ACCOUNT
- 2,22221,ACCOUNT
- 2,22222,ACCOUNT
- 3,33331,ACCOUNT
- 4,44441,ACCOUNT
- (4) Since the NODEs are taken care of, let's craft our RELATIONSHIP CSV files.
Relationships
For relationship data sources, there’s three mandatory fields:- TYPE
- The relationship type to use for the relationship.
- START_ID
- The id of the start node of the relationship to create.
- END_ID
- The id of the end node of the relationship to create.
[danielyeap@myhost neo4j-data]$ cat rel-cust-acct.csv
:START_ID(CUSTOMER),:END_ID(ACCOUNT),:TYPE
1,11111,OWNS
1,11112,OWNS
2,22221,OWNS
2,22222,OWNS
3,33331,OWNS
4,44441,OWNS
[danielyeap@myhost neo4j-data]$ cat rel-txfer.csv
TXID,:START_ID(ACCOUNT),:END_ID(ACCOUNT),amount:int,:TYPE
1,11111,11112,100,TXFER
2,11111,22222,200,TXFER
3,22221,33331,300,TXFER
4,44441,11112,400,TXFER
5,33331,22221,500,TXFER
6,11111,22222,600,TXFER
7,11111,33331,700,TXFER
8,11111,33331,800,TXFER
[danielyeap@myhost neo4j-data]$ cat rel-withdraw.csv
TXID,:START_ID(CUSTOMER),:END_ID(ATM),amount:int,:TYPE
1,1,1,100,WITHDRAW_FROM
2,1,2,200,WITHDRAW_FROM
3,2,3,300,WITHDRAW_FROM
4,4,1,400,WITHDRAW_FROM
5,3,2,500,WITHDRAW_FROM
6,1,2,600,WITHDRAW_FROM
7,1,3,700,WITHDRAW_FROM
8,1,3,800,WITHDRAW_FROM
:START_ID(CUSTOMER),:END_ID(ACCOUNT),:TYPE
1,11111,OWNS
1,11112,OWNS
2,22221,OWNS
2,22222,OWNS
3,33331,OWNS
4,44441,OWNS
[danielyeap@myhost neo4j-data]$ cat rel-txfer.csv
TXID,:START_ID(ACCOUNT),:END_ID(ACCOUNT),amount:int,:TYPE
1,11111,11112,100,TXFER
2,11111,22222,200,TXFER
3,22221,33331,300,TXFER
4,44441,11112,400,TXFER
5,33331,22221,500,TXFER
6,11111,22222,600,TXFER
7,11111,33331,700,TXFER
8,11111,33331,800,TXFER
[danielyeap@myhost neo4j-data]$ cat rel-withdraw.csv
TXID,:START_ID(CUSTOMER),:END_ID(ATM),amount:int,:TYPE
1,1,1,100,WITHDRAW_FROM
2,1,2,200,WITHDRAW_FROM
3,2,3,300,WITHDRAW_FROM
4,4,1,400,WITHDRAW_FROM
5,3,2,500,WITHDRAW_FROM
6,1,2,600,WITHDRAW_FROM
7,1,3,700,WITHDRAW_FROM
8,1,3,800,WITHDRAW_FROM
(5) Now that we have all the files that we need to perform the data loading, it is time to execute the command:
[danielyeap@myhost neo4j-data]$ neo4j-import --into ~danielyeap/neo4j/data/graph.db --nodes customer.csv --nodes account.csv --nodes atm.csv --relationships rel-txfer.csv --relationships rel-cust-acct.csv --relationships rel-withdraw.csv
Importing the contents of these files into /home/danielyeap/neo4j/data/graph.db:
Nodes:
/home/danielyeap/neo4j-data/customer.csv
/home/danielyeap/neo4j-data/account.csv
/home/danielyeap/neo4j-data/atm.csv
Relationships:
/home/danielyeap/neo4j-data/rel-txfer.csv
/home/danielyeap/neo4j-data/rel-cust-acct.csv
/home/danielyeap/neo4j-data/rel-withdraw.csv
Available memory:
Free machine memory: 11.08 GB
Max heap memory : 2.73 GB
Nodes
[*>:??------------------------------------------------------------------------------||NODE:7.||] 10k
Done in 481ms
Prepare node index
[*DETECT:7.63 MB-------------------------------------------------------------------------------] 0
Done in 11ms
Calculate dense nodes
[*>:??-----------------------------------------------------------------------------------------] 0
Done in 297ms
Relationships
[*>:??--------------------------------------------------------------------------------------|P|] 10k
Done in 68ms
Node --> Relationship
[*>:??-----------------------------------------------------------------------------------------] 10k
Done in 10ms
Relationship --> Relationship
[*>:??-----------------------------------------------|v:??-------------------------------------] 10k
Done in 10ms
Node counts
[*COUNT:76.29 MB-------------------------------------------------------------------------------] 10k
Done in 218ms
Relationship counts
[*>:??------------------------------------------|COUNT-----------------------------------------] 10k
Done in 10ms
IMPORT DONE in 2s 664ms. Imported:
13 nodes
22 relationships
66 properties
==============================
NOTE:
(i) You can refer to the documentation about the command line HERE.
(ii) The "--into" option must point to the directory where neo4j database is located (look in <neo4j_install_dir/conf/neo4j-server.properties) =>
org.neo4j.server.database.location=/home/danielyeap/neo4j/data/graph.db
(iii) If there is an error about existing database, you can use the following procedure to remove it:
~ While Neo4j is up and running, go to "org.neo4j.server.database.location" and run "rm -rf *".
~ After all the files under that directory are removed, execute the "neo4j-import" command again.
~ After the import is successful, restart Neo4j (command = neo4j restart).
~ Login to Neo4j web interface and you should see your data loaded.
Labels:
:ID,
:LABEL,
data,
import,
neo4j,
neo4j-import,
relationship
Saturday, August 22, 2015
D3.js: How to draw a Node Relationship Graph like Neo4J?
First of all, I am deeply sorry for the lack of update for this blog! I have been really busy with my work, family and self-learning.
Anyway, this entry is about some cool technologies that I have been spending time lately - Neo4j and D3.js.
I have always been curious about graph database. Recently, I have finally conceded to my better curious half and started to get my hands on Neo4j (one of the more popular graph database engine).
I am greatly impressed by its Web GUI that is able to draw a proper Node -> Relationship graph that is both pretty and practical.
At work, I have a sudden need for such a graph to analyze some really complex text-based source-target relationships. That was how D3.js came into play!
I have always known that I need to lay my hands on D3.js one day for data visualisation. This need at work just justified it.
After some googling and reading, I ended up with the codes below:
NOTE: Simplified to increase readability!
A sample of the input file "lsrel.csv" is as follow:
relnum,source,target,relationship
6,c,a,DependsOn
5,c,d,Anti-Collocated
1,a,b,DependsOn
2,a,c,StartAfter
3,b,c,StopAfter
4,b,d,Collocated
Anyway, this entry is about some cool technologies that I have been spending time lately - Neo4j and D3.js.
I have always been curious about graph database. Recently, I have finally conceded to my better curious half and started to get my hands on Neo4j (one of the more popular graph database engine).
I am greatly impressed by its Web GUI that is able to draw a proper Node -> Relationship graph that is both pretty and practical.
![]() |
| Courtesy from Neo4j website |
At work, I have a sudden need for such a graph to analyze some really complex text-based source-target relationships. That was how D3.js came into play!
I have always known that I need to lay my hands on D3.js one day for data visualisation. This need at work just justified it.
After some googling and reading, I ended up with the codes below:
NOTE: Simplified to increase readability!
<!DOCTYPE html>
<html lang="en">
<head>
<%@page pageEncoding="UTF-8" contentType="text/html; charset=UTF-8"%>
<title>Node Relationship Graph</title>
<script type="text/javascript" src="d3/d3.min.js"></script>
<style>
path.link {
fill: none;
stroke: #666;
stroke-width: 1.5px;
}
circle {
fill: #ccc;
stroke: #fff;
stroke-width: 1.5px;
}
text {
fill: #000;
font: 10px sans-serif;
pointer-events: none;
}
</style>
</head>
<BODY>
<script type="text/javascript">
d3.csv("data/lsrel.csv", function(error, links) {
var nodes = {};
var rel = {};
// Compute the distinct nodes from the links.
links.forEach(function(link) {
link.id = "rel" + link.relnum;
// link.relnum = link.relnum;
var sLinkSrc = link.source;
var sLinkTgt = link.target;
link.source = nodes[link.source] ||
(nodes[link.source] = {name: link.source, relcnt: 0, srccnt: 0, tgtcnt: 0});
link.target = nodes[link.target] ||
(nodes[link.target] = {name: link.target, relcnt: 0, srccnt: 0, tgtcnt: 0});
link.relationship = link.relationship;
if (nodes[sLinkSrc])
{
nodes[sLinkSrc]["relcnt"] = nodes[sLinkSrc]["relcnt"]+1;
nodes[sLinkSrc]["srccnt"] = nodes[sLinkSrc]["srccnt"]+1;
}
if (nodes[sLinkTgt])
{
nodes[sLinkTgt]["relcnt"] = nodes[sLinkTgt]["relcnt"]+1;
nodes[sLinkTgt]["tgtcnt"] = nodes[sLinkTgt]["tgtcnt"]+1;
}
// console.log(JSON.stringify(nodes));
// console.log("NODEPROP: " + nodes[sLinkSrc].name);
});
var width = screen.width-80,
height = screen.height-80;
console.log("Width: " + width);
console.log("Height: " + height);
var force = d3.layout.force()
.nodes(d3.values(nodes))
.links(links)
.size([width, height])
.linkDistance(350)
.charge(-800)
.on("tick", tick)
.start();
var drag = force.drag()
.on("dragstart", dragstart);
var svg = d3.select("body").append("svg")
.attr("width", width)
.attr("height", height);
// build the arrow.
svg.append("svg:defs").selectAll("marker")
.data(["end"])
.enter().append("svg:marker")
.attr("id", String)
.attr("viewBox", "0 -5 10 10")
.attr("refX", 22)
.attr("refY", -1)
.attr("markerWidth", 8)
.attr("markerHeight", 8)
.attr("orient", "auto")
.append("svg:path")
.attr("d", "M0,-5L10,0L0,5");
// add the links and the arrows
var path = svg.append("svg:g").selectAll("path")
.data(force.links())
.enter()
.append("svg:path")
.attr("id", function(d) { return d.id; } )
.attr("class", "link")
.attr("marker-end", "url(#end)");
var mytext = svg.append("svg:g").selectAll("text")
.data(force.links())
.enter()
.append("text")
.attr("dx", "150")
.attr("dy", "-8")
.append("textPath")
.attr("xlink:href", function(d) { return "#" + d.id; })
.attr("style", "fill:magenta; font-weight:bold; font-size:12")
.text(function(d) { return d.relationship; } );
// define the nodes
var node = svg.selectAll(".node")
.data(force.nodes())
.enter().append("g")
.attr("class", "node")
.call(force.drag);
// add the nodes
node.append("circle")
.attr("r", 12)
.attr("fill", "grey")
.append("svg:title")
.text(function(d) { return "Source: " + d.srccnt + " ~ Target: " + d.tgtcnt; });
// add the text
node.append("text")
.attr("x", 12)
.attr("dy", ".35em")
.attr("style", "fill:blue; font-weight:bold; font-size:16")
.text(function(d) { return d.name; });
node.append("text")
.attr("text-anchor", "middle")
// .attr("style", "font-weight:bold; font-size:12")
.attr("style", function(d) {
if (d.relcnt >= 3)
{
return "font-weight:bold; font-size:12; fill:red"
}
else
{
return "font-weight:bold; font-size:12"
}
})
.text(function(d) { return d.relcnt; });
// add the curvy lines
function tick() {
path.attr("d", function(d) {
var dx = d.target.x - d.source.x,
dy = d.target.y - d.source.y,
dr = Math.sqrt(dx * dx + dy * dy);
return "M" +
d.source.x + "," +
d.source.y + "A" +
dr + "," + dr + " 0 0,1 " +
d.target.x + "," +
d.target.y;
});
node
.attr("transform", function(d) {
return "translate(" + d.x + "," + d.y + ")"; });
}
function dragstart(d)
{
d3.select(this).classed("fixed", d.fixed = true);
}
if (error)
{
console.log(error);
}
else
{
console.log(nodes);
console.log(links);
console.log(path);
console.log(rel);
}
});
</script>
</BODY>
</HTML>
|
A sample of the input file "lsrel.csv" is as follow:
relnum,source,target,relationship
6,c,a,DependsOn
5,c,d,Anti-Collocated
1,a,b,DependsOn
2,a,c,StartAfter
3,b,c,StopAfter
4,b,d,Collocated
Saturday, April 18, 2015
Docker: OpenDayLight (ODL)
I have always wanted to learn more about Software Defined Network (SDN) when I first heard about it from a colleague (now ex-colleague) about 2 years ago.
However, I have been really busy (a.k.a lazy) with work and family. Not until recently when I stumbled upon an interesting opportunity that drove me to take a peek at it.
Ok, the first big question is "OpenFlow or OpenDayLight"? Since I do not have a lot of time to perform research on their respective strengths and weaknesses, I have resorted to a very "scientific" way to choose among the two. In the end, I chose OpenDayLight because (wait for it...) I prefer their website :).
Since I am a big fan of Docker, it doesn't make sense for me to not install OpenDayLight on Docker. A quick google landed me with this. I am not interested in Debian, so I made some changes to the Dockerfile to switch the base image to Centos 6.6.
NOTE:
(i) My test shows that Java 8 is currently not supported and will give weird Java NullPointerException while executing command.
(ii) You can download the Dockerfile here.
By executing "docker build -t opendaylight:helium ." in the directory where the Dockerfile is stored, I ended up with a Docker image that contains OpenDayLight.
After starting the container using "docker run" command (refer to the above screenshot), it is time to SSH connect to it and install some ODL components.
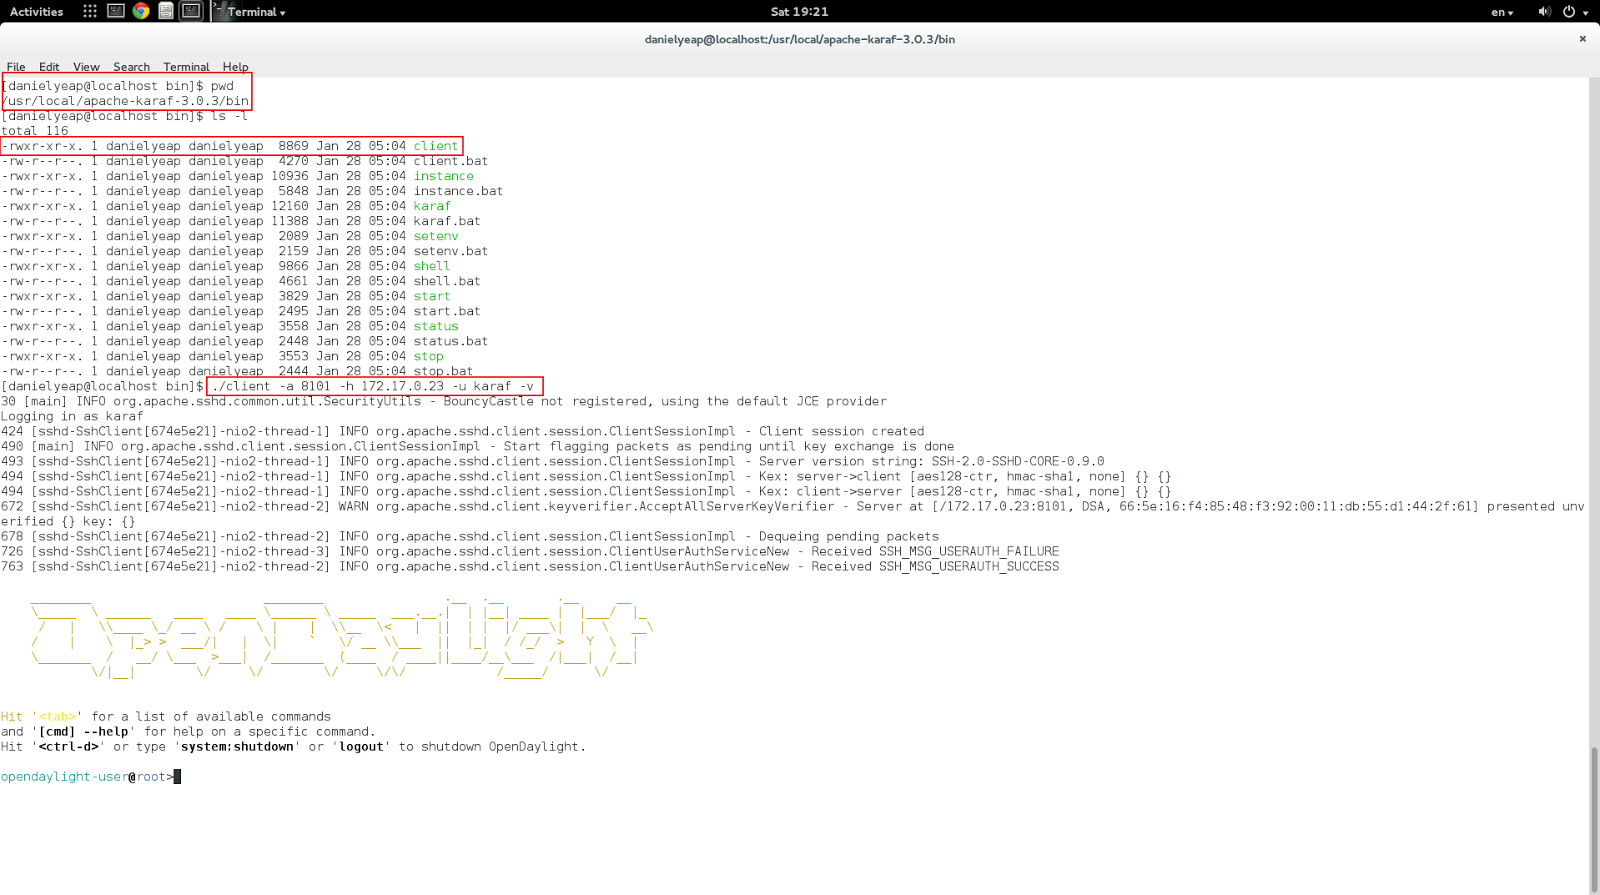
This can be achieved by using the Karaf client (download).
To install some basic features, you can execute "feature:install odl-restconf odl-l2switch-switch odl-mdsal-apidocs odl-dlux-core".
Now, you can proceed to login to OpenDayLight User Experience (DLUX) using URL "<IP of the Docker container>:8181/dlux/index.html.
To learn ODL further, you can download its documentation from this page.
However, I have been really busy (a.k.a lazy) with work and family. Not until recently when I stumbled upon an interesting opportunity that drove me to take a peek at it.
Ok, the first big question is "OpenFlow or OpenDayLight"? Since I do not have a lot of time to perform research on their respective strengths and weaknesses, I have resorted to a very "scientific" way to choose among the two. In the end, I chose OpenDayLight because (wait for it...) I prefer their website :).
Since I am a big fan of Docker, it doesn't make sense for me to not install OpenDayLight on Docker. A quick google landed me with this. I am not interested in Debian, so I made some changes to the Dockerfile to switch the base image to Centos 6.6.
FROM centos:6.6
# Install required software (170MB)
RUN yum update -y && yum install -y tar wget java-1.7.0-openjdk
# Download and install ODL
WORKDIR /opt
RUN mkdir opendaylight
RUN wget -q "https://nexus.opendaylight.org/content/groups/public/org/opendaylight/integration/distribution-karaf/0.2.3-Helium-SR3/distribution-karaf-0.2.3-Helium-SR3.tar.gz" && \
tar -xf distribution-karaf-0.2.3-Helium-SR3.tar.gz -C opendaylight --strip-components=1 && \
rm -rf distribution-karaf-0.2.3-Helium-SR3.tar.gz
EXPOSE 162 179 1088 1790 1830 2400 2550 2551 2552 4189 4342 5005 5666 6633 6640 6653 7800 8000 8080 8101 8181 8383 12001
WORKDIR /opt/opendaylight
ENV JAVA_HOME /usr/lib/jvm/jre-1.7.0-openjdk.x86_64
CMD ["./bin/karaf", "server"]
|
NOTE:
(i) My test shows that Java 8 is currently not supported and will give weird Java NullPointerException while executing command.
(ii) You can download the Dockerfile here.
By executing "docker build -t opendaylight:helium ." in the directory where the Dockerfile is stored, I ended up with a Docker image that contains OpenDayLight.
![]() |
| OpenDayLight on Docker |
After starting the container using "docker run" command (refer to the above screenshot), it is time to SSH connect to it and install some ODL components.
This can be achieved by using the Karaf client (download).
![]() |
| Connect to the ODL container through Karaf client |
To list all supported features, you can execute the "feature:list" command.
![]() |
| List all supported features |
To list currently installed features, you can use the "feature:list -i" command.
![]() |
| Default installed features |
![]() |
| Install some basic features |
The default user ID and password are "admin" and "admin" respectively.
![]() |
| DLUX login page |
Voila, you are in!
![]() |
| DLUX login page |
I am still far from really knowing how to use ODL properly. I might even explore OpenFlow one day.
Anyway, I had fun trying it out and hope that you would too!
Sunday, April 12, 2015
Java: Stream Control Transmission Protocol (SCTP)
If you have not heard about SCTP, don't fret! Me neither, until recently.
For a good explanation about SCTP, you can read this and this and this. In short, SCTP is basically TCP on steroids!
People who knows me well knew that I am always curious about new technology or technology new to me (sorry if I confuse you :).
How can I miss the chance to explore SCTP futher? Of course, the language of choice would be Java - still my favorite language after all these years.
First, I created the SctpServer class to serve as a SCTP server.
Next, I created the SctpClient class to serve as the SCTP client that will connect to multiple SCTP servers started on different ports (same host in this case) through a single socket (YES, you read it right, single socket!).
From the image above, you can see that there are 2 SctpServer listening on port 12000 and 12001 respectively.
Once the ScptClient connects to them and send them messages, you can see both servers reported that the connection came from port 43975 with stream number of 0 (SctpServer that listens on port 12000) and 1 (SctpServer that listens on port 12001) respectively.
Now, if you take a look at the codes for SctpClient, there is no "connect" statement at all. That is because a new association will automatically be created for every "send" command. [reference]
The destination of your message/data is now encapsulated in the MessageInfo object.
If you have the interest to explore SCTP further, you can download the sample codes here.
Enjoy hacking!
For a good explanation about SCTP, you can read this and this and this. In short, SCTP is basically TCP on steroids!
People who knows me well knew that I am always curious about new technology or technology new to me (sorry if I confuse you :).
How can I miss the chance to explore SCTP futher? Of course, the language of choice would be Java - still my favorite language after all these years.
First, I created the SctpServer class to serve as a SCTP server.
Next, I created the SctpClient class to serve as the SCTP client that will connect to multiple SCTP servers started on different ports (same host in this case) through a single socket (YES, you read it right, single socket!).
![]() |
| Two SctpServers listening on port 12000 and 12001. An SCTP client sends message to them on the same socket. |
Once the ScptClient connects to them and send them messages, you can see both servers reported that the connection came from port 43975 with stream number of 0 (SctpServer that listens on port 12000) and 1 (SctpServer that listens on port 12001) respectively.
![]() |
| SctpClient uses SctpMultiChannel for its communication. |
Now, if you take a look at the codes for SctpClient, there is no "connect" statement at all. That is because a new association will automatically be created for every "send" command. [reference]
The destination of your message/data is now encapsulated in the MessageInfo object.
If you have the interest to explore SCTP further, you can download the sample codes here.
Enjoy hacking!
Subscribe to:
Posts (Atom)